
How to Make a LEGO Table Top That Doubles as an Activity Table
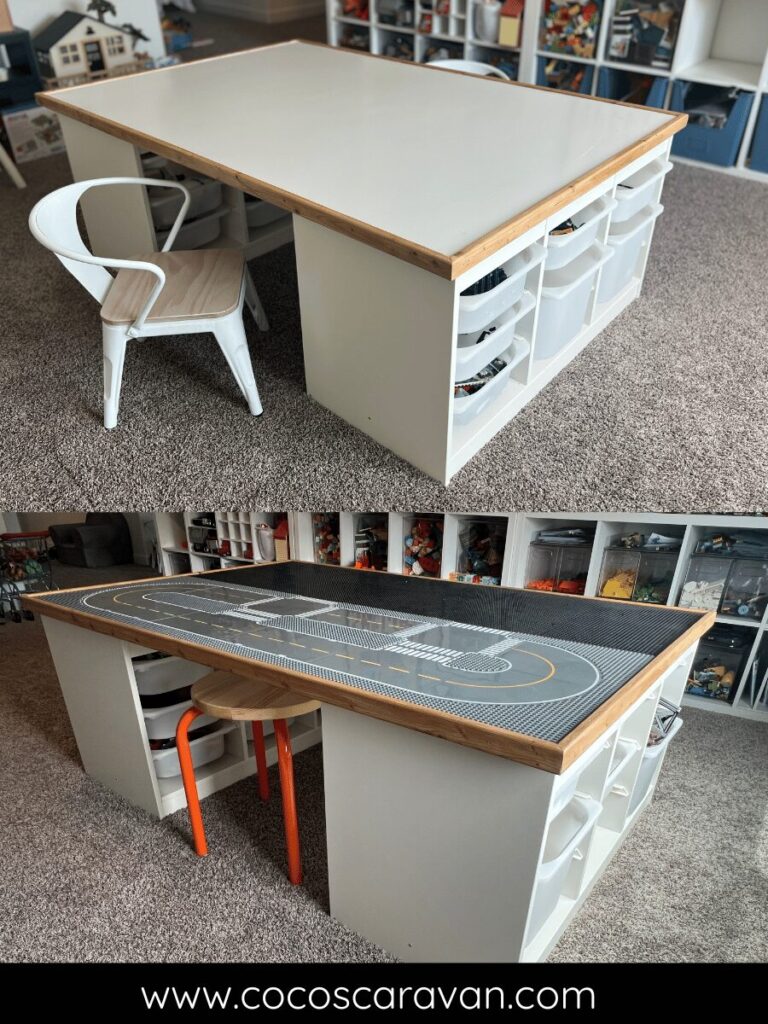
Looking for a simple way to create a LEGO table without building an entire piece of furniture? This DIY LEGO table top is such a fun and functional project—and it’s easier than you think! One side is covered with LEGO baseplates for building, and the other is a smooth surface perfect for everyday use like drawing, puzzles, or snacks. The best part? It rests right on top of IKEA Trofast storage units, so you don’t even have to build a base!
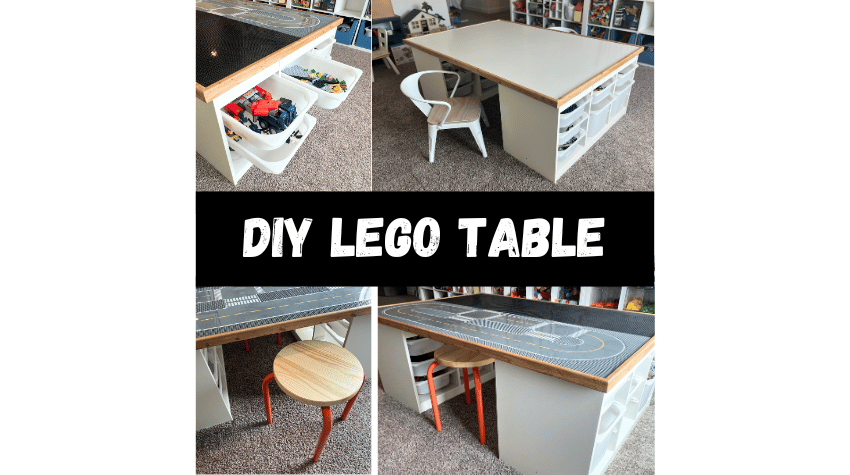
Table of Contents
Reversible Lego Table
I wanted a reversible LEGO table because most LEGO tables you can buy are super fun—but when you’re not building with LEGOs, they end up just taking up space. I wanted something more functional for our playroom. So I designed a table with a top that flips over to become a regular activity surface. On one side, it’s perfect for building LEGOs, and on the other, we use it for drawing, playing with wooden trains, driving cars, doing crafts, and more. The best part is that the tabletop is completely removable, so when we want a wide open space to play, I can just store the top away. It’s been the perfect flexible solution for our ever-changing play needs!
Why we love it
- Two-in-one design: One side for LEGO, one side for everyday use. Just flip it over!
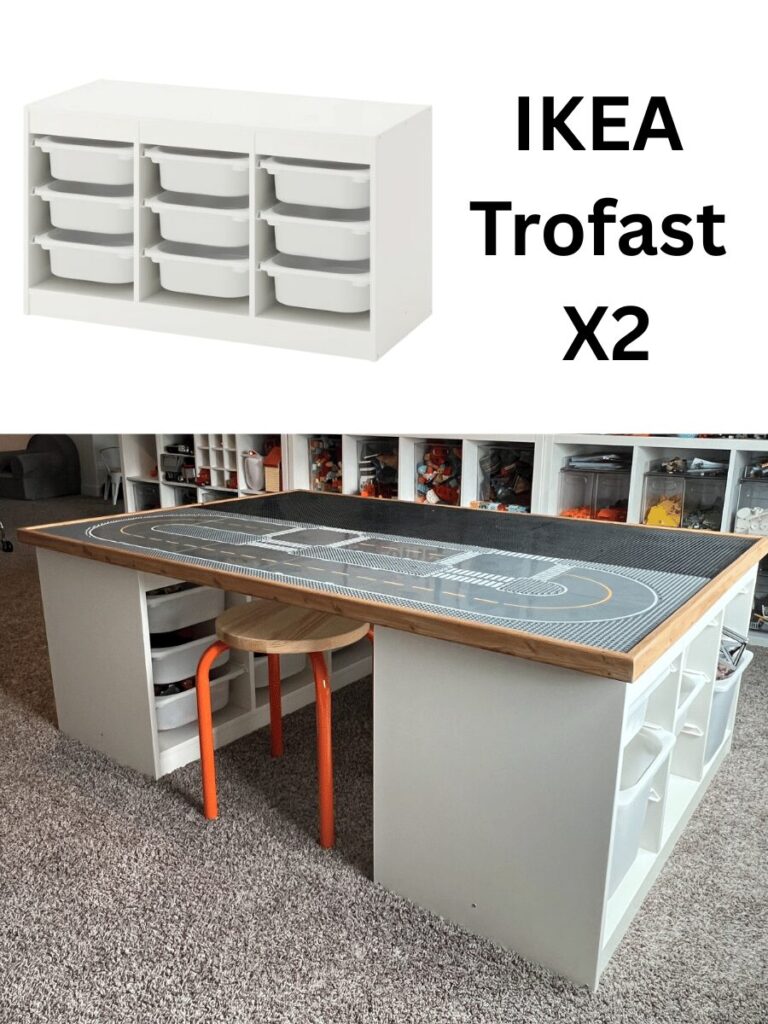
- Fits perfectly: Designed to rest on top of two IKEA Trofast units.
- Easy to remove: Move it around or store it when not in use.
- Storage underneath: The Trofast bins are perfect for storing LEGO bricks, sets, and accessories.
Ikea Trofast Units
Using the IKEA Trofast storage units as the base makes this LEGO Table project so much easier—because all you have to do is build the tabletop! I already had these units in our playroom, so it made perfect sense to create a removable LEGO table top that could rest right on top. I love that we get tons of storage underneath for LEGO pieces, sets in progress, and other toys. It’s a super functional setup that looks great and works perfectly for our space.
Want to See How We Keep Our Playroom Organized?
Don’t miss my full playroom organization post—packed with practical tips, smart storage solutions, and ideas that keep the space fun and functional!
Supplies You’ll Need
- 3/4″ X 4X8 Plywood (doesn’t need to be a nice grade, it will go underneath anyway)
- Smooth wall panel with pre-finished white coating
- (3) 1X2X8 Furring strip board
- Nail Gun
- 1 1/4″ brad nails
- Wood Filler
- Sander
- 220 Sand paper
- Caulk
- Wood Glue
- (2) Ikea Trofast Units
- Lego Plates
- Road Lego Plates
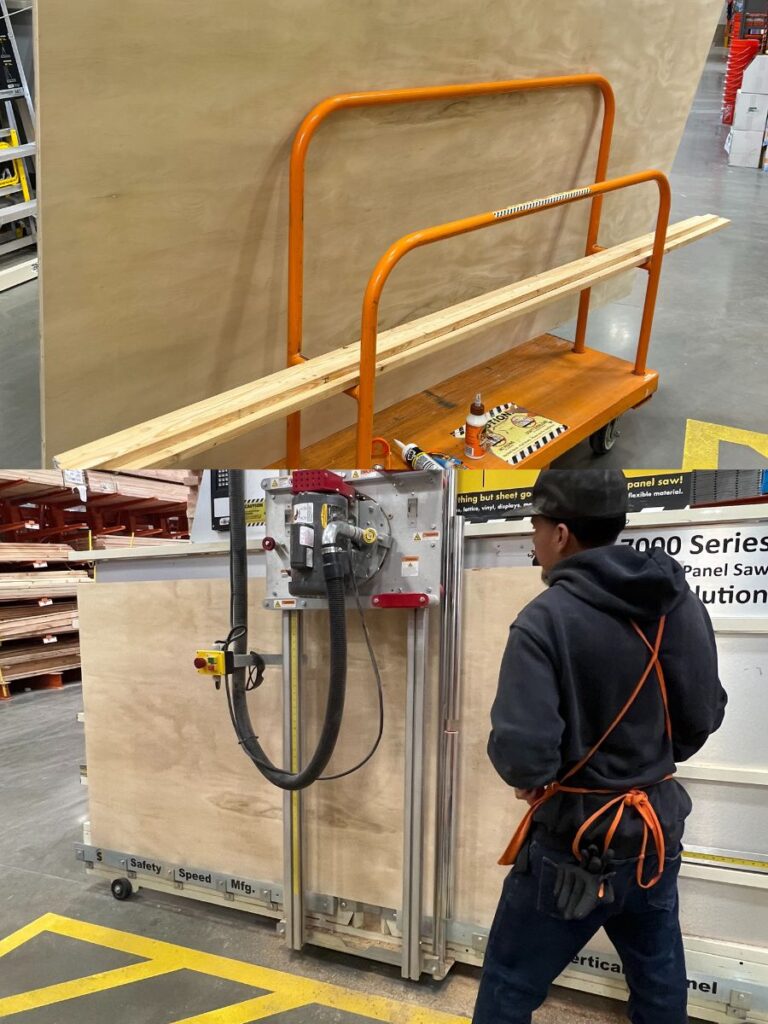
Measure and Cut Plywood and Wall Panel
Start by deciding how big you want your LEGO table top to be. I designed mine to sit right on top of two IKEA Trofast units, using their width as a base. You can customize the length, but keeping the width close to the Trofast units makes it stable and easy to remove or flip over.
The width of one Trofast unit is about 39 inches. I decided to do four LEGO baseplates across, which adds up to slightly more than that (since each baseplate is 10″ x 10″). I rounded up and had my plywood cut to 40 inches wide—this gave a slight overhang on the sides, but I loved the way it looked. It also made the math and cutting way simpler!
For the full tabletop, I used 4 LEGO baseplates across and 6 down, which made my final tabletop size 40 inches by 60 inches. That gave my kids plenty of space to build, and the extra length works great for two kids to sit on opposite sides between the Trofast units.
When I pick up plywood at Home Depot, I also grab a thin wall panel to glue onto one side of the table (the side that won’t have the LEGO baseplates). It gives a nice, smooth finish and makes the table look a lot more polished. Just make sure to have them cut the wall panel to the exact same size as your plywood since you’ll be gluing it on.
I always have them do all the cuts for me at the store—it’s so helpful for fitting everything in my car and saves time once I’m home. One tip: if I did this again, I’d ask them to cut the wood just ¼ inch bigger on both sides. The baseplates didn’t quite fit perfectly, so I had to trim a few—but that was easy with a straight edge and utility knife!
Adding Trim to Plywood
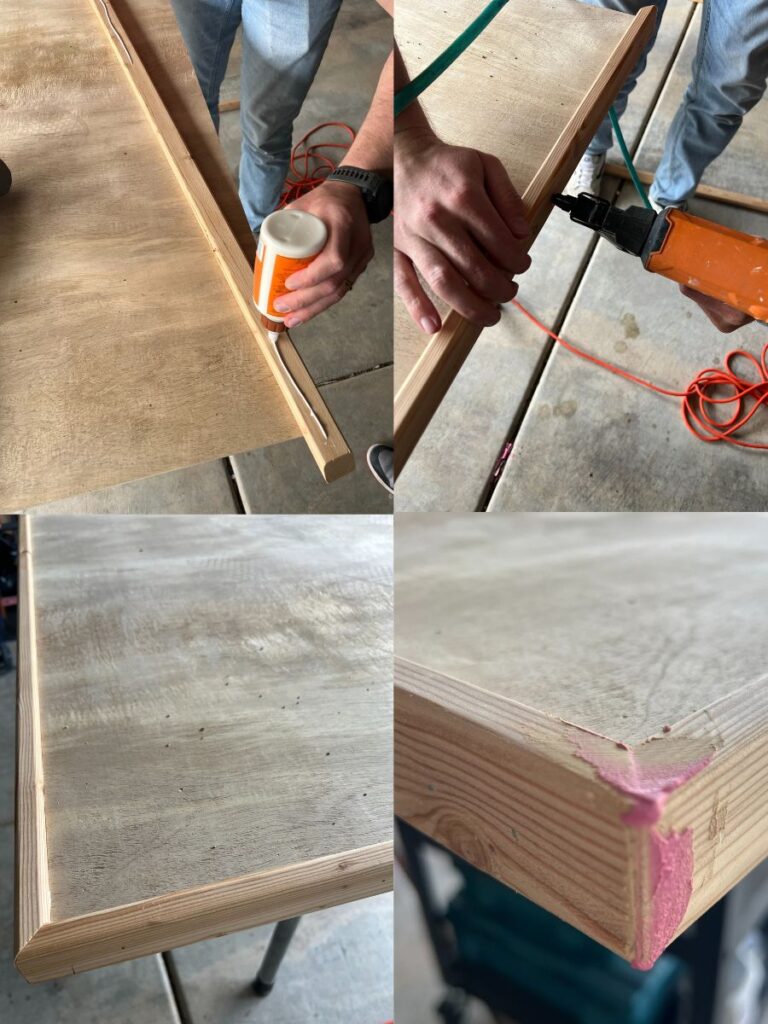
The first step in assembling the table top is adding the trim. I used furring strip boards, which are lightweight and affordable—perfect for a simple project like this. Before attaching them, I measured and cut each piece to size using a miter saw, angling the ends so they fit together neatly at the corners. Once everything was cut, I used wood glue along the edges of the plywood, then secured the trim in place with a nail gun.
Before attaching, I also used a router tool to give the trim a curved, finished edge—and honestly, it made the biggest difference in the final look. It added a polished, professional touch to the table and made the whole project feel extra special.
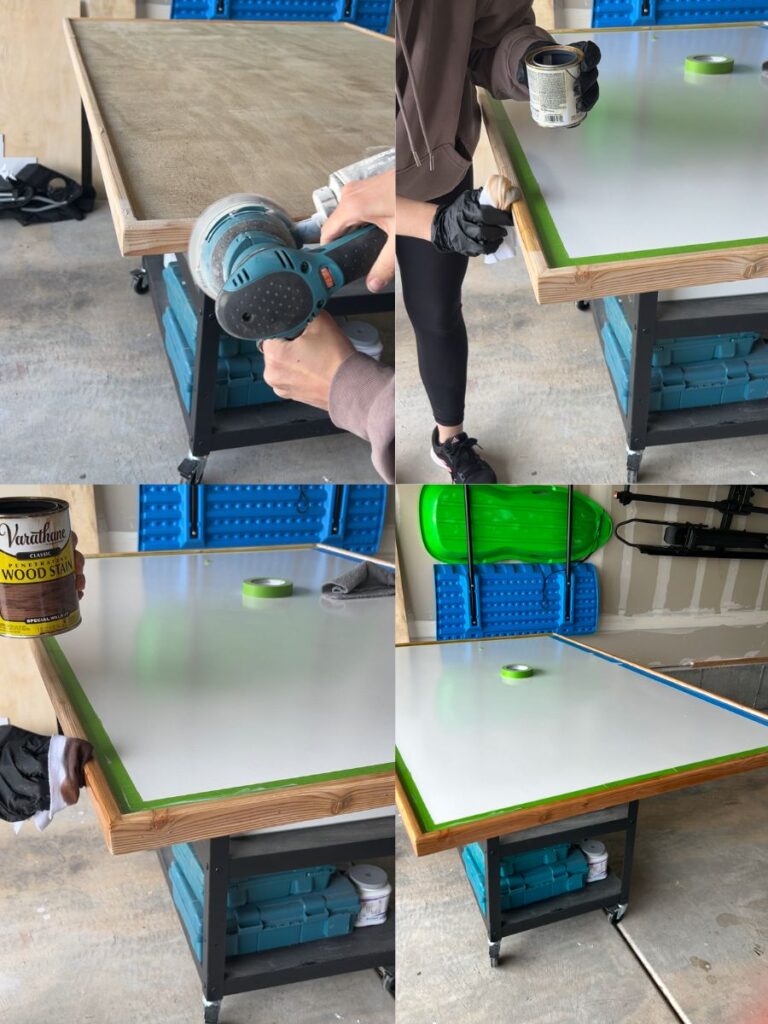
Sanding and Wood Filler
After attaching the trim, give the entire edge a good sanding using 220-grit sandpaper. This smooths out any rough spots and helps the corners blend together nicely. If you notice any small indentations or nail holes from the nail gun, fill them in with wood filler and let it dry before sanding. I always do this step before adding the whiteboard wall panel so I can get a clean, smooth edge without accidentally sanding the panel itself. Once the wood filler is dry and the edges are smooth, it makes a big difference in the final finish!
Stain or Paint Trimming
Once everything is sanded smooth, it’s time to finish the trim. You can either stain or paint it depending on the look you’re going for. I decided to stain the trim because I thought it would be tricky to match the paint color exactly to the IKEA Trofast units. But if you’re using the wooden Trofast units, you could definitely paint the trim to match for a more seamless look.
Since I chose to stain, I made sure to use a pre-stain wood conditioner first—this helps the stain go on evenly and avoids blotchy spots. After that, I applied my stain and finish in one to save time and give the trim a nice polished look. It’s a simple step that really makes the whole table look more finished and intentional!
Glue Wall Panel
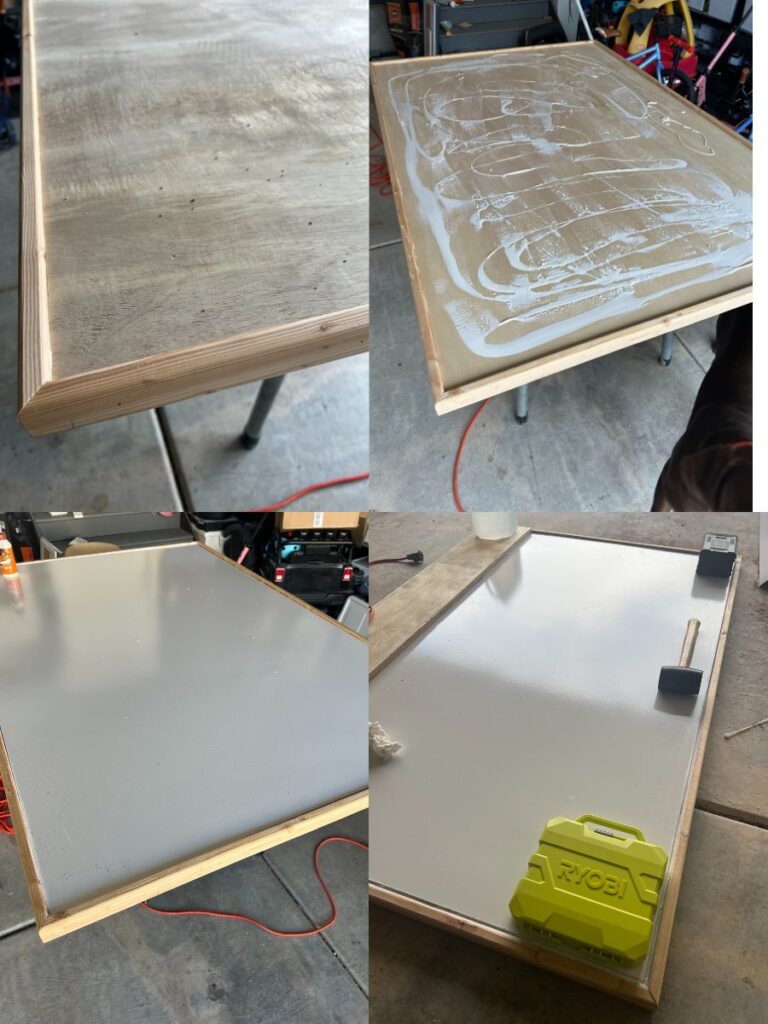
After finishing the trim, you’re ready to glue the white wall panel to one side of the table top. This will be your smooth, non-LEGO side. Use plenty of wood glue—especially along the corners and edges—to make sure it stays firmly in place. I skipped this step too quickly at first, and my corners started to pop up, so I had to go back and re-glue them. Lesson learned: don’t skimp on glue!
Once it’s in place, I set heavy weights across the panel to keep everything flat and help it dry evenly. One thing I did mess up—my whiteboard panel ended up slightly smaller than the plywood. To fix it, I filled the small gap between the trim and the whiteboard with caulk. It’s totally optional and only necessary if your cut isn’t a perfect match, but it worked great for me and gave the edge a clean look.
Add the lego plates
Now for the fun part—adding the LEGO baseplates to the other side of your table top! This is where you can get creative and design it based on your kids’ interests. You can stick with one solid color, mix and match, or even incorporate LEGO road plates if your kids love building cities. It’s totally customizable!

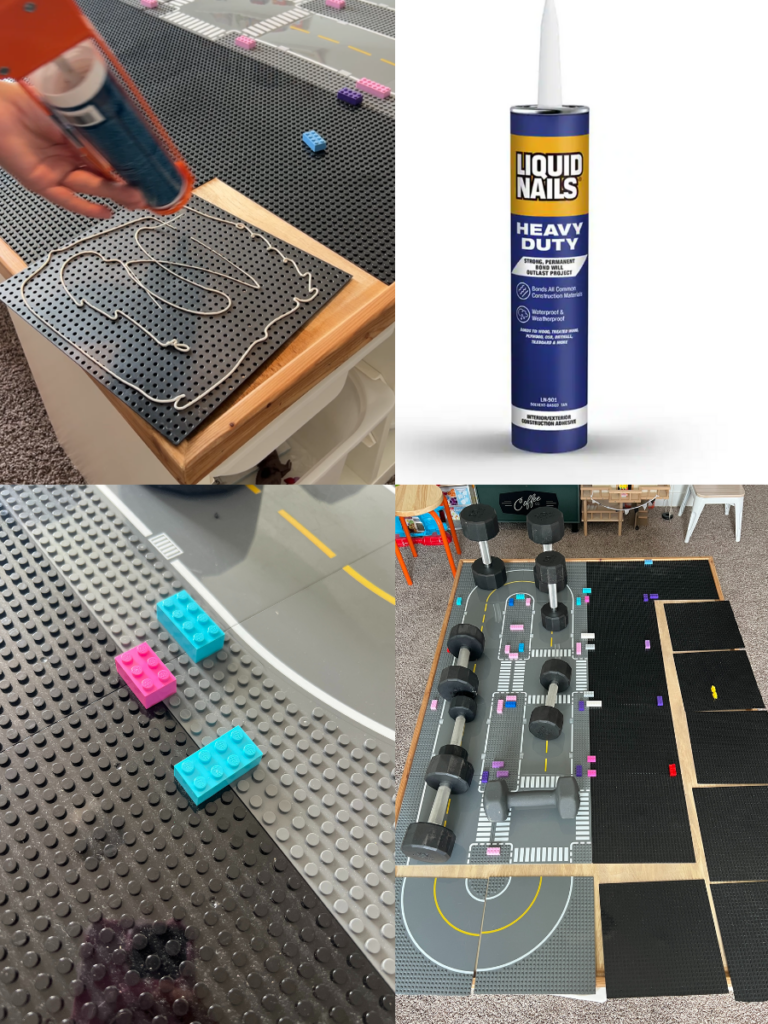
I’m planning to glue mine down, but when I shared a video of this on YouTube, a lot of people suggested using Velcro tape or magnets so the plates can be rearranged. I’m still deciding what I’ll do, but if you know your design is staying put, gluing is a great option. I’ve seen Liquid Nails construction adhesive recommended as the best way to secure the plates—it holds strong and keeps everything flat and sturdy. Just make sure to line them up carefully before pressing them into place!
One really helpful tip I got was to use actual LEGO bricks to connect the plates together before gluing. This ensures all your plates are perfectly aligned and spaced correctly while you’re attaching them. It makes a huge difference in how smooth and seamless the surface turns out!
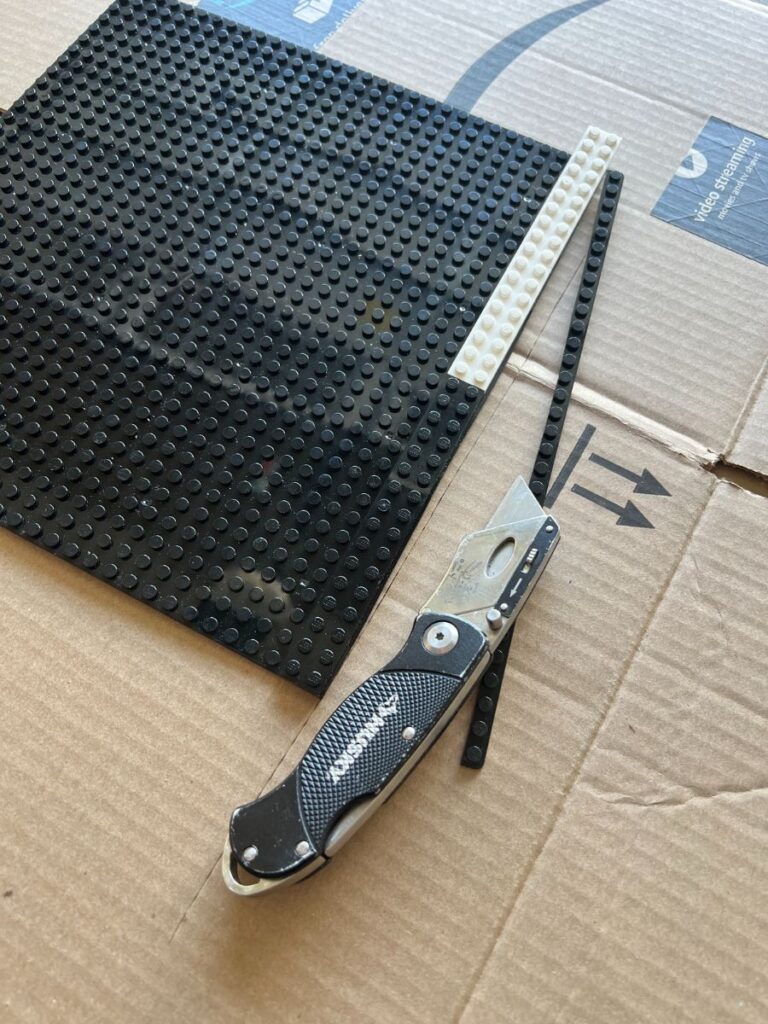
How to cut or trim lego plates
Just in case you end up in a situation where you need to trim or cut a LEGO plate, here are a few tips that helped me. If you have long, flat LEGO pieces, use them to build a straight line across the plate where you want to cut. Then use an X-Acto knife to carefully score along that line—this helps you stay straight and precise.
If one edge ends up slightly longer or sticks out unevenly, you can sand it down for a cleaner fit. I had a friend hold the plate while I used a sander on the edge, and it worked perfectly. These little adjustments can make a big difference in how polished your finished Lego table looks!
How to Glue Lego Plates
To attach the LEGO plates to the plywood, I used Liquid Nails adhesive and started in one corner, working my way across. As I glued each plate down, I connected them with LEGO bricks to make sure they stayed evenly spaced and aligned. I left two sides unfinished until the end so I could make adjustments if needed. Since I bought my plates on Amazon, they weren’t all exactly the same size, so I had to use a pocket knife and a sander to trim some of the edges to get them to fit just right. Once everything was in place, I put weights on top to help flatten and secure the plates while the adhesive dried.
Need Help Organizing All Those LEGO Bricks?
Check out my blog post all about how we organize our LEGO pieces—it’s full of simple, kid-friendly ideas that actually work!
Looking for a Simple IKEA Hack for a Play Table?
Check out how I used just two IKEA Trofast units to create an easy and functional activity table—no LEGO top required!